


Cafelat Espresso Robot Upgrade Guide
How to increase your shot consistency and learn to love your Robot.

The Cafelat Espresso Robot is a modern copy of the Faema Baby produced in the late 1950’s in Italy down to the hue of green available. There are improvements in both materials and looks but we need to keep in mind that the original came out 70 years ago.
When Paul Pratt designed the Espresso Robot he essentially updated the Faema Baby for modern production in Hong Kong (since moved to the UK) and had the casual, mobile espresso enthusiast in mind. He has stated many times that his intention wasn’t to make the all encompassing espresso machine but rather a simple device that was easy to use, would last a long time and more importantly was portable. I’m sure he had to have suspected that Coffee Nerds would not leave it alone.
With that let’s begin our discussion of all the Cafelat Espresso Robot’s inherent flaws or what were probably design decisions to stay within scope and how to improve them.
Usability Items
Note: None of the links provided in this article are affiliate links and are provided to make your life easier, nothing more.
These are things that make the Espresso Robot more pleasurable to use and in my opinion increase its usefulness by quite a bit. I don’t think I enjoyed my Robot as much before I made these upgrades.
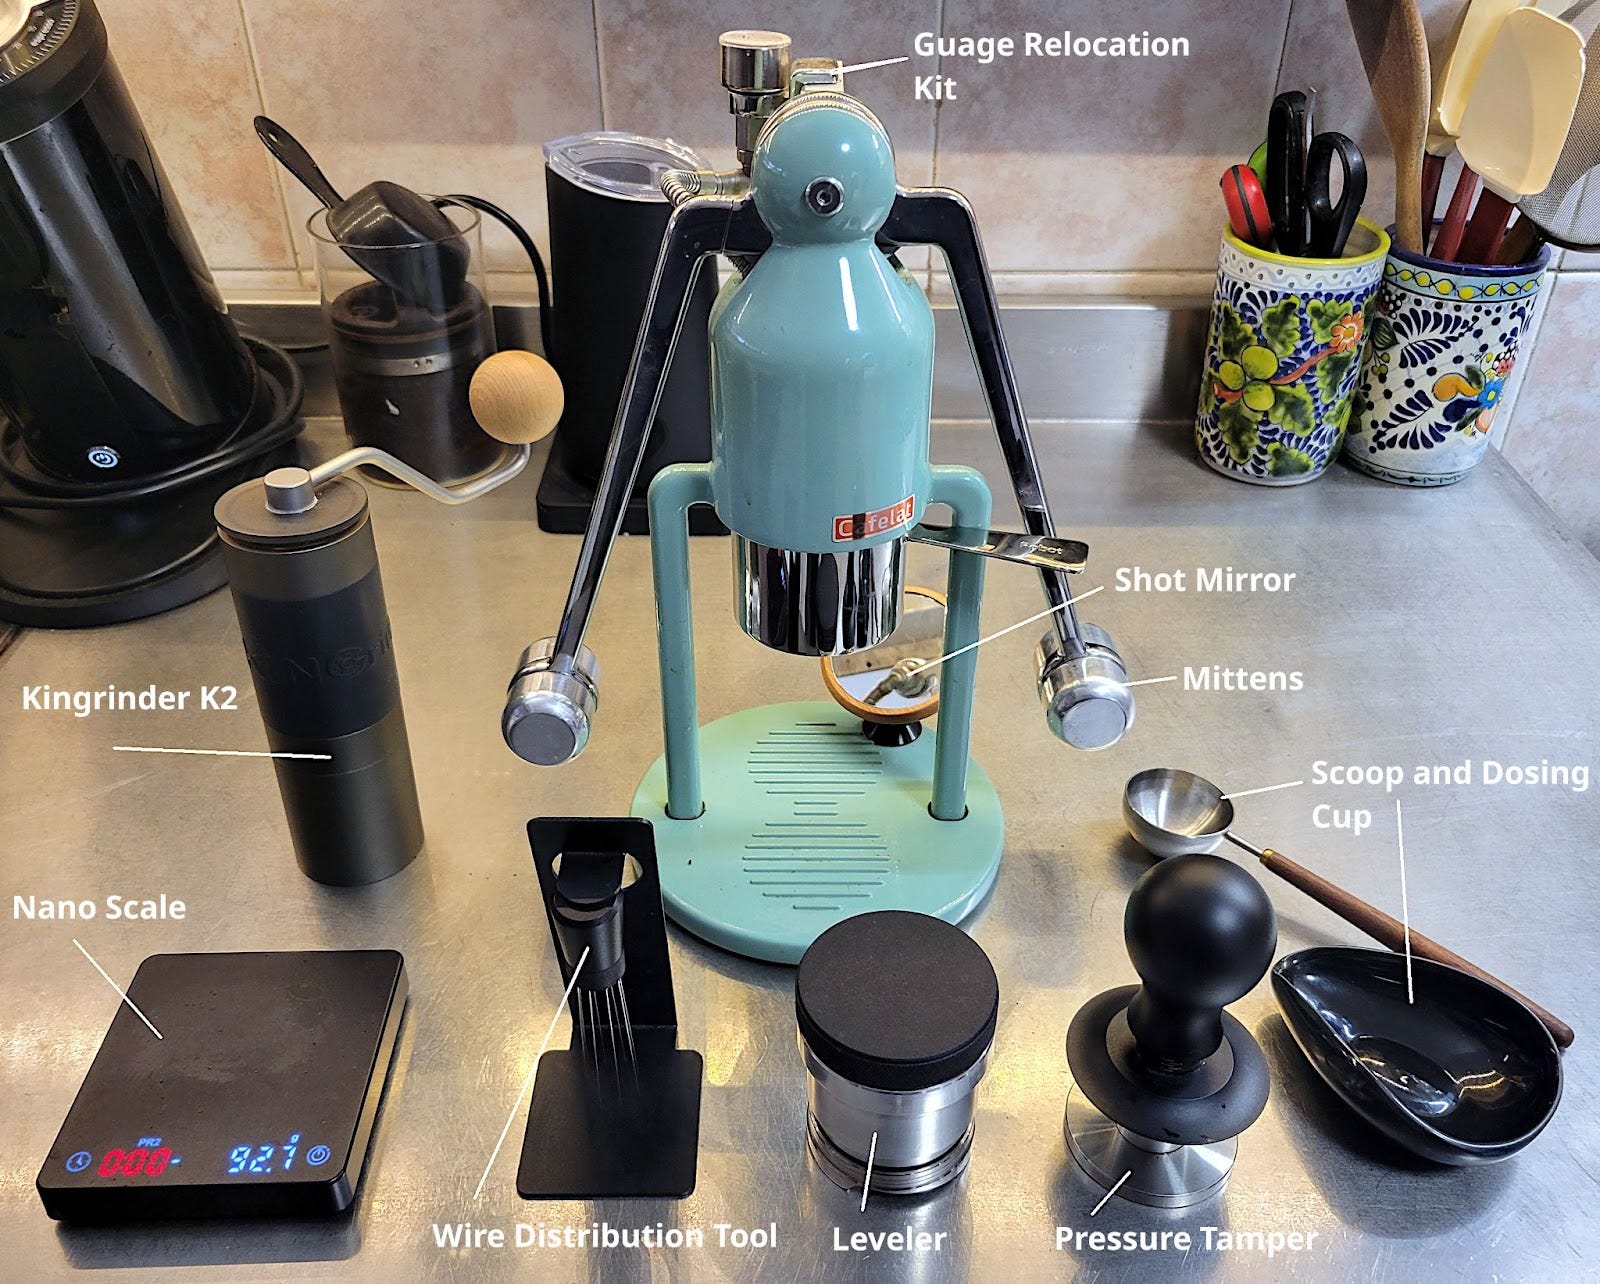
Robot Mittens
The robots arms are adorable with their little robot fingers but are horribly uncomfortable to press down on creating intense pressure points. They’re probably made this way due to the need to be crafted from a piece of bar steel of a certain thickness. You can solve this problem by buying mittens. I got mine from Chompo Kitsana which makes aftermarket products for the Espresso Robot. I’d give links to each product but a lot of the URLs have Thai characters so don’t translate well. Browse the entire shop here - https://shopee.co.th/kitsana9556#product_list
They make various thickness mittens for the Robot. I got the extra larger (XL) which makes the robot a little top heavy when the arms are up. If I were to do it again I’d get the normal size. I paid about $18 for my mittens.
Robot Arm Holders
When you raise the Robot’s arms they don’t stay up. There are a lot of different DIY solutions to this including gluing thin magnets onto the arms so when they’re reaching up the magnets connect. Chompo Kitsana has a kit to solve this but I didn’t buy it because it was bulky. For my workflow the arms aren’t a problem. I prepare my basket, then lift both arms at the same time, reach down and grab the portafilter and put it in the Robot with one hand and push down with two. I wouldn’t mind a simple magnet solution but it hasn’t been a problem so I haven’t done anything to change it.
https://shopee.co.th/kitsana9556#product_list
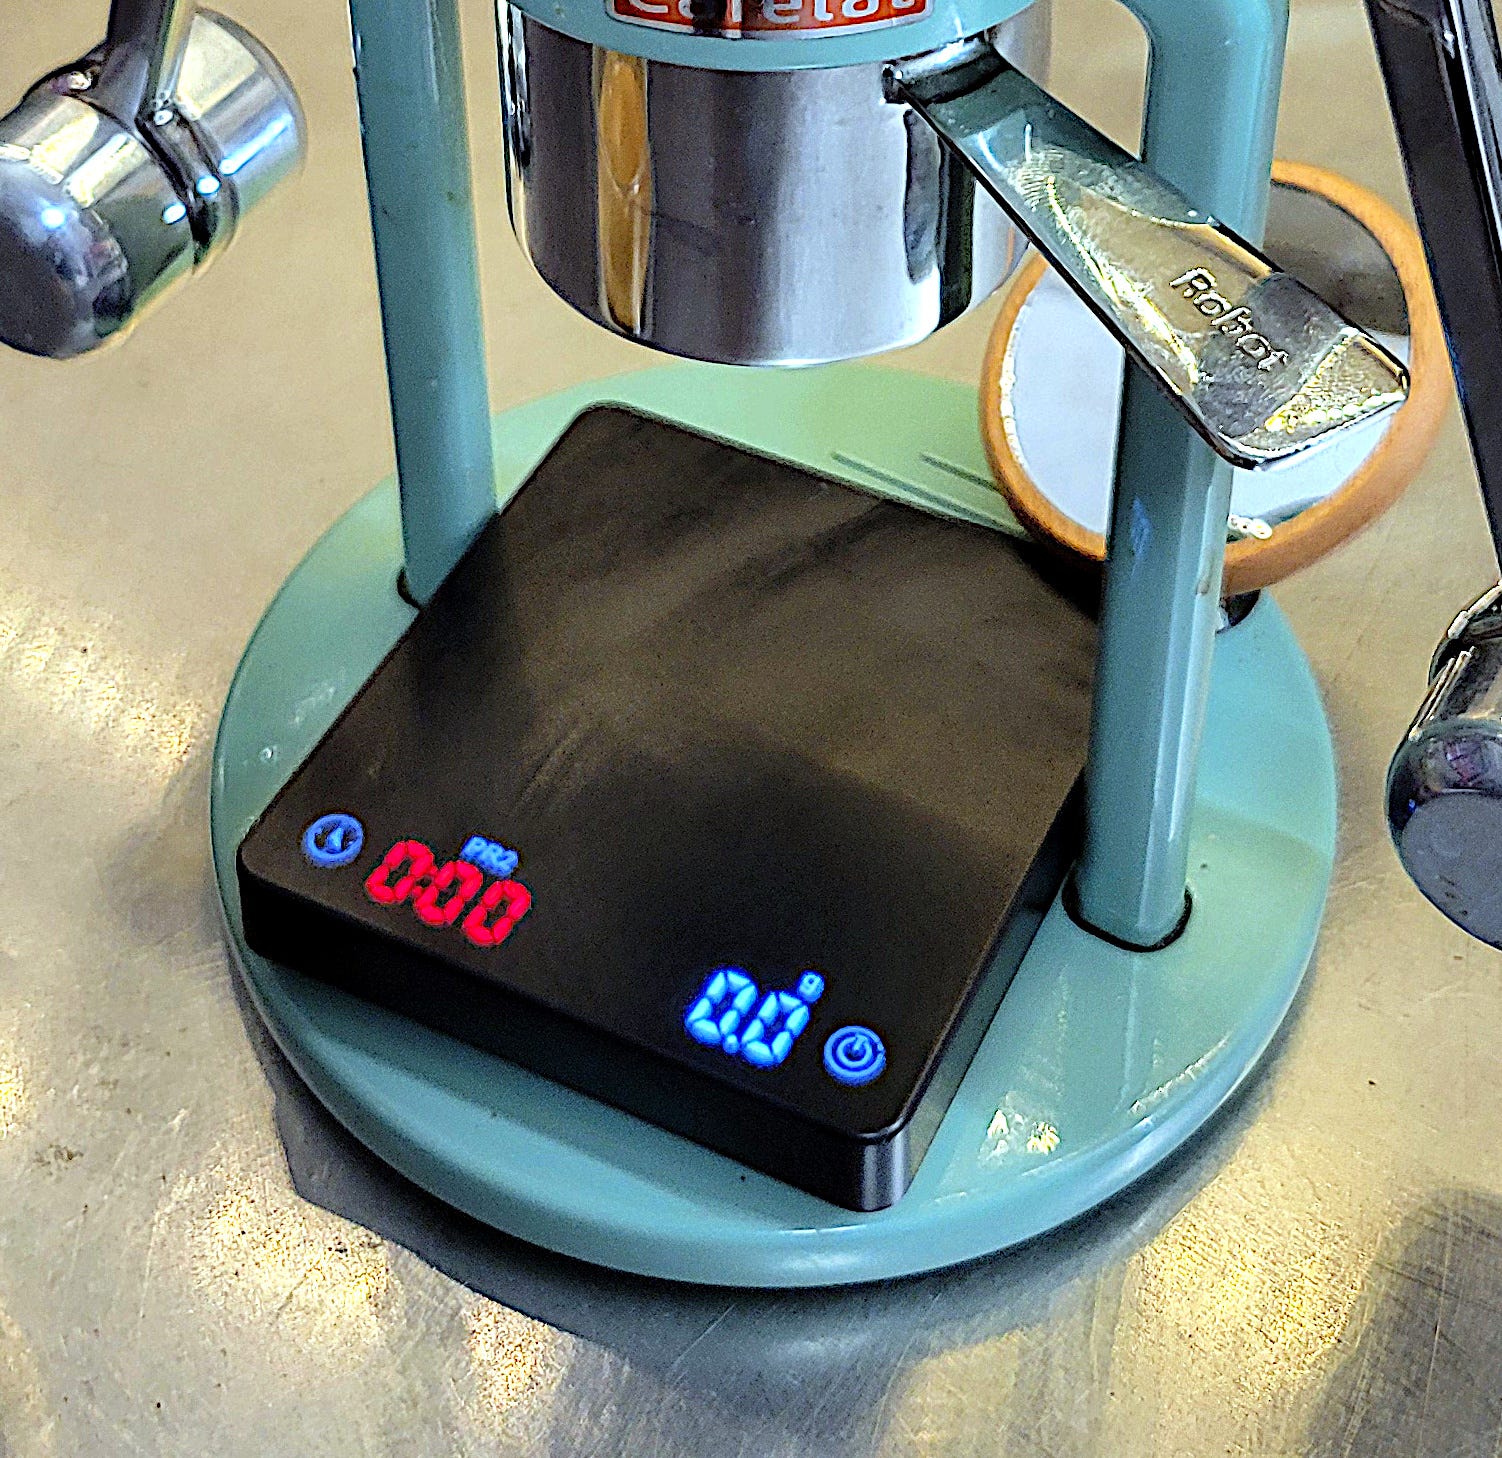
Shot Scale
The Espresso Robot was made with legs that aren’t very far apart (95mm) which restricts which scales you can use. Most of us start out with the WEIGHTMAN Espresso Scale with Timer or many other branded versions of it which to be honest is quite horrible to use. It does work, it’s better than nothing but I went through 2 of them before I started the search for something better. I found the MiiCoffee Nano Coffee Scale with Timer for $36 on Amazon. They also make a Pro version with an aluminum body for $12 more. Just like the Weightman it’s built in China and sold under many names. You can get the original plastic design on AliExpress under a bunch of different brands for about $10-$20. I’ve seen the aluminum version for about $35.
Pressure Gauge Relocation Kit
The conversation about why the pressure gauge is on the Robot’s arm has come up time and again in discussion groups. Paul gets on his knees and pulls down on Robot’s arms to pull a shot. In this position the gauge is visible. For anyone who wants to stand up to pull the shot the gauge is pointing at their chest so moving it makes a lot of sense. Many people have built kits to move the gauge to the top mounting bolt that holds the arms on. I got mine from Chompo Kitsana for $9. Put a little Locktite Blue on the screw when you put it in or it will work its way out as the arms are moved up and down.
https://shopee.co.th/kitsana9556#product_list

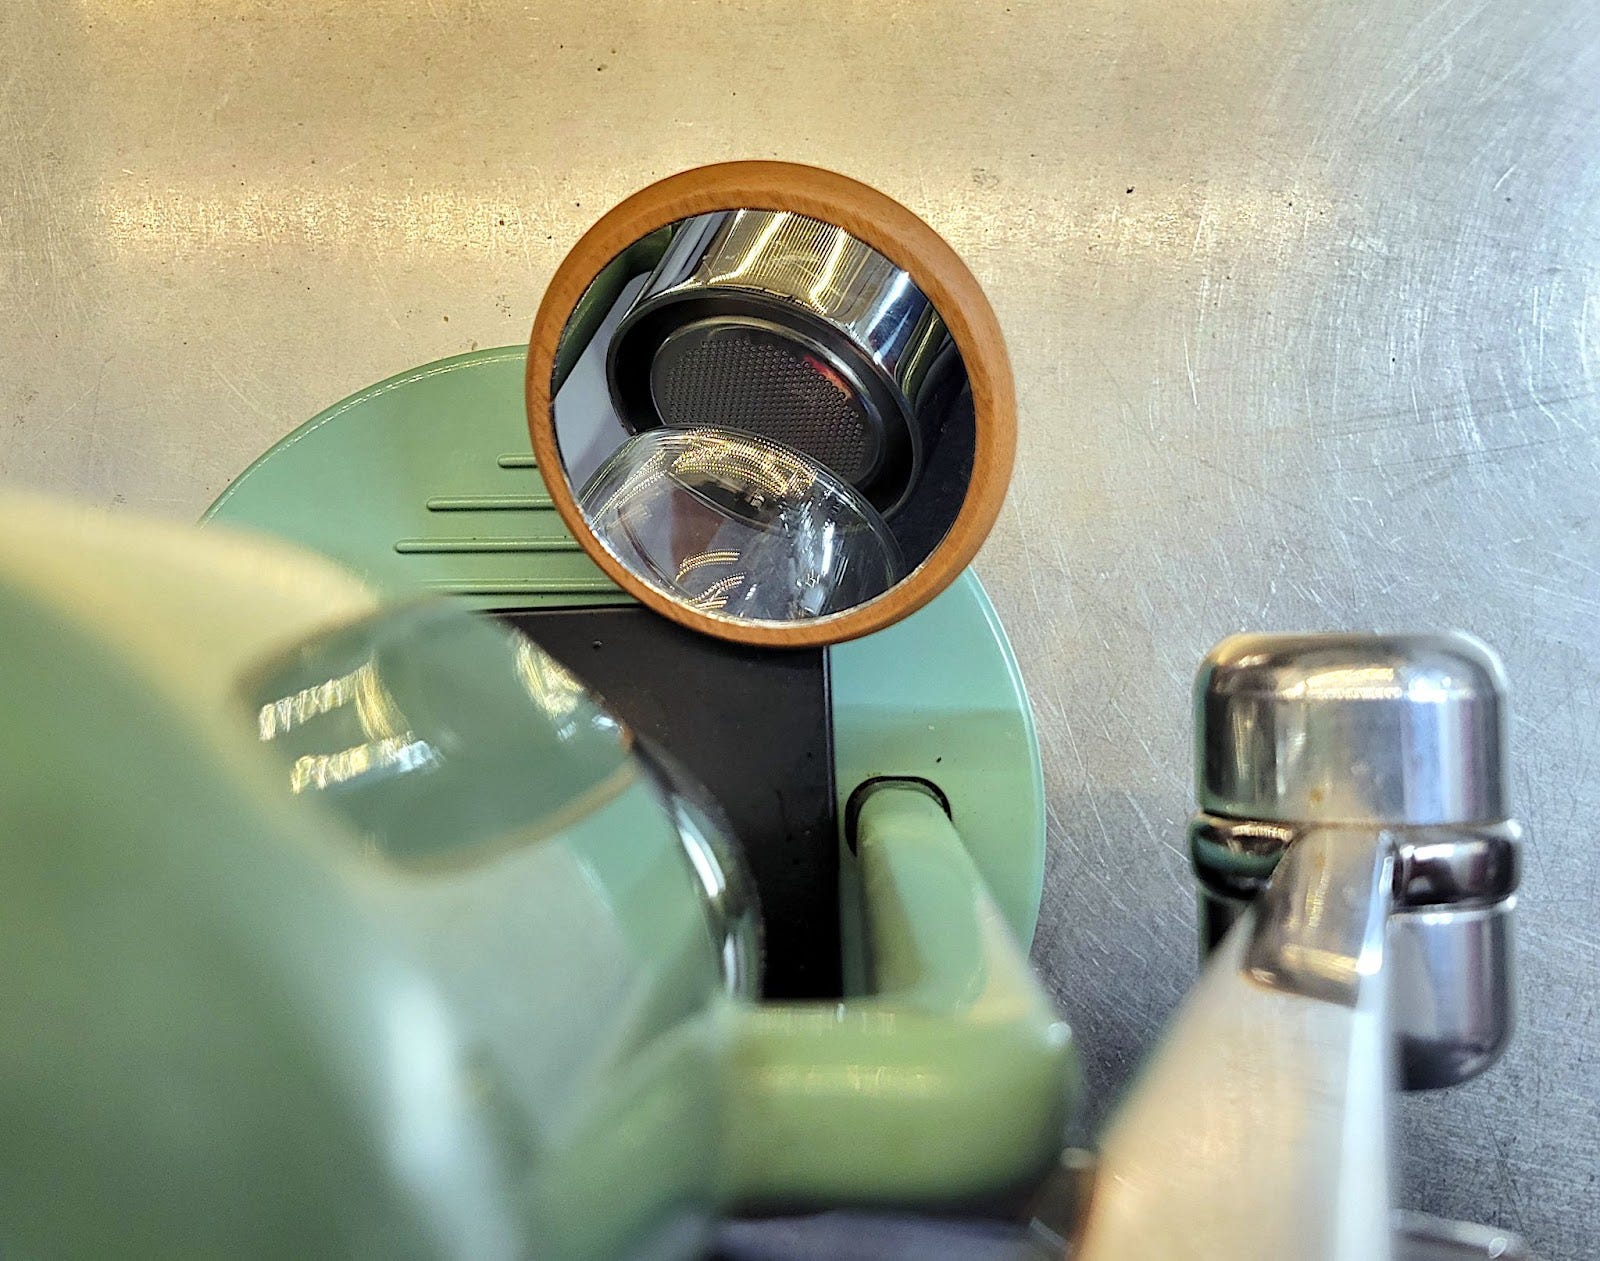
Shot Mirror
Along the same lines as the Pressure Gauge Relocation Kit, this one is to remedy a problem that Paul doesn’t have. If you get on your knees and pull down on the Robot’s arms you can see the bottom of the basket. However, if you stand up and push down you can’t so I bought a cheap shot mirror and I love it. The Shot Mirror came from Aliexpress and cost me all of $4. https://www.aliexpress.com/item/1005006827149404.html?spm=a2g0o.order_list.order_list_main.48.21ef1802vzvics
Robot Leg Extensions
Some people need more clearance under the Robot basket especially if they’re using a scale too. Chompo Kitsana makes several different lengths of legs. They sent me some with my order for free but I use the Nano scale and a single espresso cup so I’ve never installed them.
https://shopee.co.th/kitsana9556#product_list
Shot Consistency
Being a manual lever espresso machine the Robot gives you control over virtually everything - pre-infusion pressure, pre-infusion time, ramp up curve, shot pressure, shot timing, taper off pressure etc… Because there are so many variables just pulling a shot you have to have an absolutely consistent puck. If the puck is deeper on one side than the other or the espresso isn’t distributed just right it will channel. If the grind is too uniform the puck will lift. If you don’t pre-infuse the shot may channel (depending on beans and grind), if you don’t ramp up fast the puck may float. It’s imperative with the Robot for a consistent shot, to have a consistent puck. There are just too many variables already to have the puck add in a million more. There’s no reason to try different beans, grinders or attempt espresso profiling if you haven’t found a way to make your puck consistent. These upgrades are necessary.
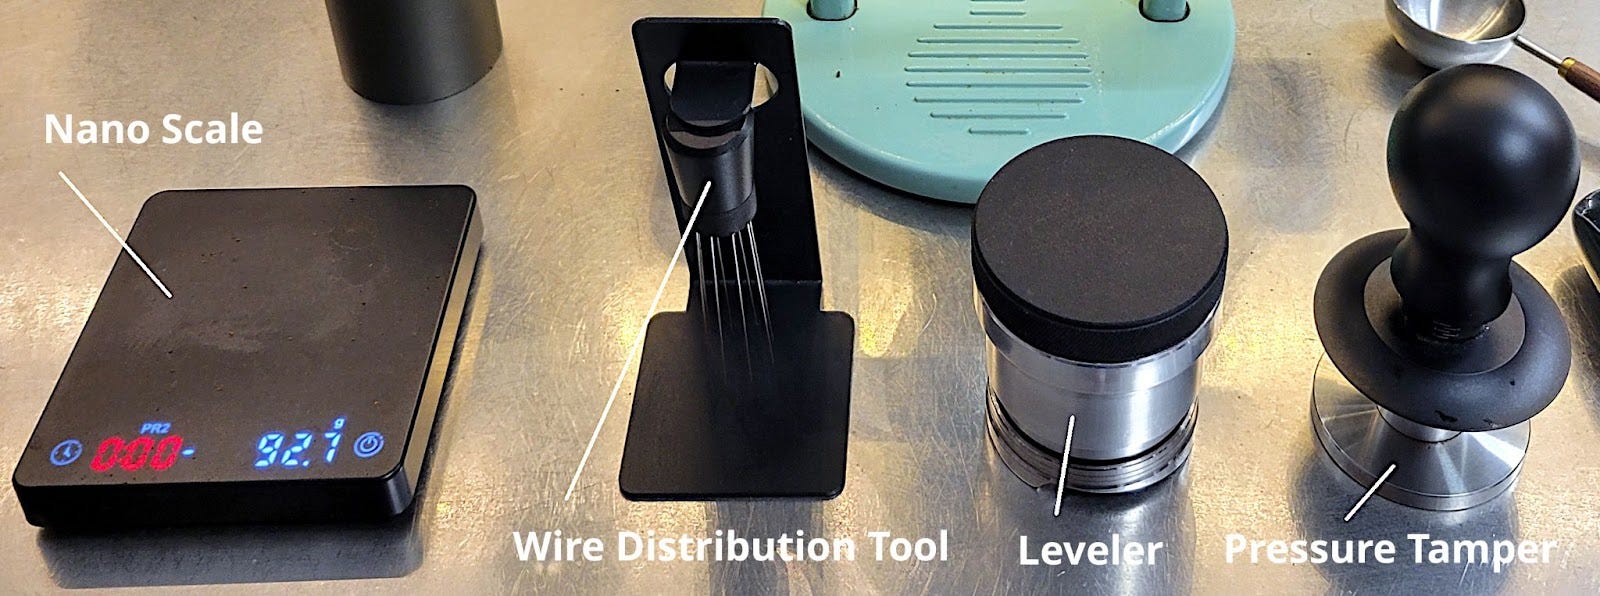
Pressure Tamper
Let’s be honest about the tamper, it’s quite horrible. It’s almost impossible to keep the tamper perfectly vertical making a horizontal bed of ground espresso. If the bed isn’t horizontal, the shot won’t be consistent. The standard tamper is also not very comfortable to put any sort of pressure on. Cafelat made a tamper which had a 3D printed piece that kept it level but at $70 I think it’s a lot to pay for a piece of plastic around my tamper. You can still find it by searching for Cafelat Leveling Tamper. I was in the process of using a lathe to turn down a 58mm pressure regulating tamper to 57.5 mm so it would fit in the Robot basket when I ordered one from Chompo Kitsana which levels and regulates pressure and is designed for the Robot for about $26. I wish it went a bit deeper but works well for an 18 gram dose.
https://shopee.co.th/kitsana9556#product_list
Leveler Tool
If you use any other espresso maker in the world you have a choice of espresso distribution tool especially if your portafilter basket is 58 mm. However, due to the very deep basket on the robot we were mostly out of luck until Chompo Kitsana started making a distributor for it. Just like the tamper I wish it were 4 mm taller but it works well extended nearly all the way if you use 18 grams of espresso in the basket. This made such a large impact on my shot that I had to adjust my DF64 with SSP Sweet Cast Burrs 5 notches courser.
https://shopee.co.th/kitsana9556#product_list
Wire Distribution Tool
This is not specific to the Espresso Robot at all but necessary. I’ve tried several solutions for WDT and I’m not 100% satisfied at this point so I keep looking. Currently I’m using this one for $10. https://www.aliexpress.com/item/1005006363373406.html?spm=a2g0o.order_list.order_list_main.58.21ef1802vzvics
I plan on sticking it to the bottom of my coffee shelf over my Robot so it doesn’t take up valuable shelf space.
Other things that I use
There’s nothing special about these things but they’re what I’ve found works for me. I buy my beans 500 grams at a time and this spoon reaches in a perfect amount and scoops up beans. I kind of wish the bowl portion of the spoon was about 50% bigger so it would get 18 grams per scoop but it isn’t. I’ve bought lot of espresso spoons and settled on this one. Get the 8 ml version.
Dosing cup
When I weigh my beans I do so in a dosing cup. I didn’t like this at first and used a small glass prep bowl but since I’ve been using hand grinders so much lately this has become invaluable. It came with a water spritzer which I don’t need and a little plastic spoon which I also didn’t need. I paid $5.50 for all three.
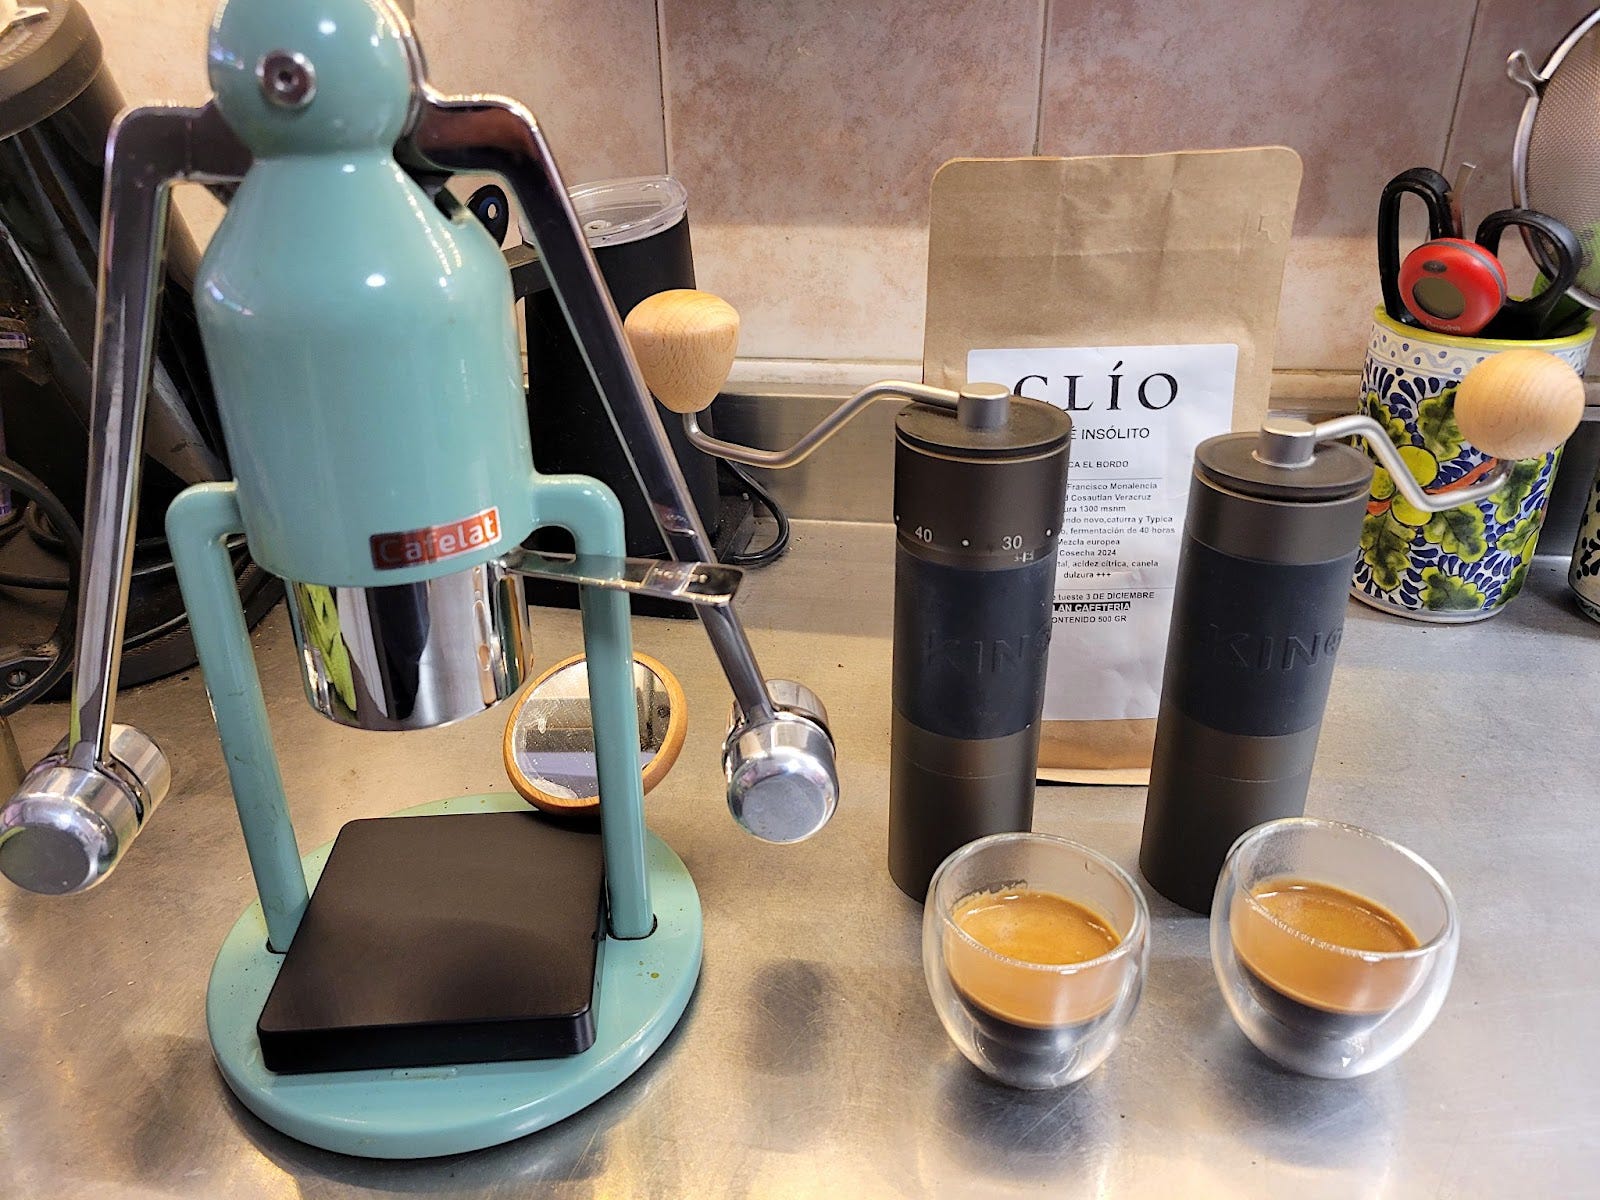
Grinders
The Espresso Robot has some special characteristics that make High Uniformity ground coffee difficult. What I experience is channeling because of the puck lifting. I believe this is because of the way the bottom of the basket is formed but since I can’t swap baskets I can’t prove it. Pre-infusion helps a ton as does ramping up to 9 bars *immediately* to put pressure on the puck. The thing that has helped the most was changing the grind to be less uniform. For me SSP Sweet Cast Burrs work a great deal better than SSP High Uniformity burrs in my DF64. The HU burrs channel about 50% of the time. I wasted a lot of coffee with them. Shaking the grounds before distributing and tamping helped a bit but even with absolutely perfect puck prep they’d channel. I chalked this up to a design issue with the Robot basket. Switching to SSP Sweet Cast Burrs helped a lot but even with meticulous puck prep I channel about 10% of the time.
While researching Kingrinder hand grinders I decided to test them all. Like every combination of burrs and form factor and I found that almost every one made rock solid, perfect shots every. single. time. Really, a baby could hand grind and pull a perfect shot with the Robot.
I have so far tested the Kingrinder P1, P2, K2, K3, K4, K5 and K6 grinders either directly or through proxy (same burrs, same coffee). If I were to choose the perfect grinder to pair with the Espresso Robot it would be the K3 for internal burr adjustment and K4 for external burr adjustment. I don’t find the external adjustment to be better and it places my hand further from the crank increasing pressure on my wrist. For me *personally* I’d choose the K3 or if you can’t get it the K2.
I got my K2 for $62.
Compression Issues
The top of the basket is full of air when the piston pushes down. Liquids don’t compress but air does.
Other espresso machines push water into the brew chamber and push the air out but we add our water in an open brew chamber so that’s not possible. The more air you have in the top of your brew basket the less consistent the pressure on the water will be as it gets compressed which only gets its resistance from the puck. Excess air compounds inconsistent puck prep.
It helps to fill the basket as full as you can with water. When the shot reaches the desired volume you manually stop the shot by lifting the Robot arms and removing the portafilter. The brew basket will still have water in it covering the shower screen so pour that out before taking the shower screen out and dumping the shot. The negative to this method is that you end up with really messy wet pucks and most puck analysis probably won’t be helpful.
Heat Issues
The piston is heated by the water in the basket
We don’t have to worry too much about the temperature of the brew basket. You can test this by wrapping your hand around it and pouring boiling water into it. It gets hot fast enough that you’ll drop it within seconds. The temperature of the water in the brew basket doesn’t lose a lot of heat either because the brew basket walls are quite thin. We also don’t have to worry about the Portafilter as the brew basket only makes contact with it at the very top ring of the basket.
We do however, have to worry about the temperature of the piston as it’s a giant hunk of metal and makes a great heat sink, in other words it sucks a lot of heat energy out of the water in the brew basket. This is because each shot pulled back to back increases the piston temperature by about 2-3 degrees Celsius with the most drastic difference being between the 1st and 2nd shots.
A lot of people have come up with various DIY solutions.
Insulate the piston to keep it from heating up with a 58 mm backflush disk.
Preheating the piston by placing heat pads inside it.
https://www.home-barista.com/repairs/cafelat-robot-pre-heating-mod-t87415.html
Thermal Undies (thundies)
Basket plugs
Using a heat plate
https://stefan.antoni.io/preheating-the-cafelat-robot/?fbclid=IwY2xjawF88RdleHRuA2FlbQIxMQABHR9D8mMqJVUPJEIDTvSjLVVjbtRy5pt_NFpgjOM6EZXerhO2Gt3drtIELA_aem_PgN4LxT6VZ3EZGZqaZDhFw
Which method do I use? None of them currently as I pull one shot of espresso at a time so I grind for the temperature of the first shot (about 84 C). However, I will start playing with making Solution #5 more practical soon. If I can make it part of my workflow without too much fuss then I’ll implement it.
Shot Profiling
The last upgrade is shot profiling. I don’t recommend going this far if you haven’t nailed consistent shots or it will be a massive waste of money. However, once you have every single shot coming out exactly the same then there may be potential in profiling your espresso shots. One device that does this is the Smart Espresso Profiler from Naked Portafilter. The Smart Espresso Profiler connects to your smartphone and records time and pressure information.
I haven’t purchased this mainly due to it costing nearly as much as the Espresso Robot itself! The current price of the Smart Espresso Profiler for the Cafelat Espresso Robot is $335 USD with the larger than standard gauge. You do save the $10 on not needing a guage relocation kit so there’s that. If you want the Steampunk gauge the price is $350.
You can also have it sync up with an Acaia smart scale so it will correlate pressure information with scale weight allowing you to figure out flow too. However, none of the Acaia scales fit between the Espresso Robot’s 95 mm wide leg space although the Acaia Lunar at 105 mm long and wide can work if you place it at an angle. You’ll have to shell out another $250 USD for the scale though.
Another option that I have not tried is the Bookoo EM bundle for the Espresso Robot. It includes a pressure monitor and mini bluetooth coffee scale for $239 which is quite a lot less than the Smart Espresso Profiler. If anyone has had experience with either I’d like to hear from you.
https://bookoocoffee.com/shop/bookoo-em-bundle-for-the-cafelat-robot?fbclid=IwZXh0bgNhZW0CMTAAAR3XKkNktaDeymdp-QNlANT5RgOlENU8nUhCkNszZZNIKmP7sAa1XkUAupQ_aem_Br0o0qDJIlvqKbKdR4HNpw
Summary
I believe the best bang for the buck is getting a Kingrinder K2 (or K3), wire distribution tool, Nano Scale and a shot mirror from AliExpress along with the Espresso Leveler, Pressure Tamper, Mittens and Gauge Relocation kit from Chompo Kitsana. Using this setup you can hone your skills until you are making back-to-back consistent shots and you can tweak the variables to get your coffee to do what you want. I paid about $240 over the price of the robot for all of these upgrades including the Kingrinder K2 grinder.
The next step after the upgrades is to experiment with coffee beans from different suppliers. This particular setup will last you (literally) years without having to put another dime into your espresso setup.